How to Take Kindle Fire Pictures & Videos
FTC Disclosure: If you make a purchase via a link on this site, I may receive a small commission. There will be no added cost to you. Thank you!
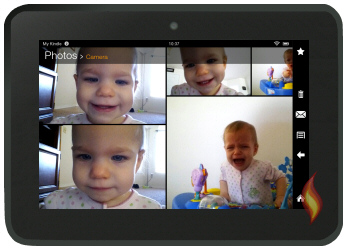
This tutorial shows you how to take Kindle Fire pictures and videos with the built-in camera on the HD tablets.
Amazon has made accessing all the camera's features quite unfriendly, so this Kindle Fire tip is super useful and much more user friendly than Amazon's lack of instructions and access!
This tutorial is specific to the Kindle Fire HD (2012) devices. The original Kindle Fire (2011) doesn't come with the built-in front-facing camera, and the newer models (2013, 2014, etc) come with the necessary camera icon (it's located under the "Photos" tab so you can access the camera directly on your tablet). Also, many of the newer models come with both front-facing and rear-facing cameras.
Thus, if you have a newer Kindle Fire you won't need this tutorial page. Not sure which version your tablet is? See this infographic to find out!
Also, if you're looking for a way to take pictures of your Kindle Fire screen, like a favorite game, see this Screenshot Tutorial.
Taking Pictures and Videos on Your Kindle Fire

There are several options for accessing the camera on your Kindle Fire HD tablet.
For this tutorial I'm going to show you the two methods I use for taking pictures AND videos. I also explain some additional ways to access your photos besides the main photo features section on your device.
Be sure to read all the way to the bottom of this tutorial for links to some optional free apps that also let you take and edit photos.
Lights, Camera, Action!
Alright, here we go!
Method #1: Use GoToApp
The easiest method discovered (thus far) for accessing both your Kindle Fire photo and video camera, is to use a fabulous little app called GoToApp!
You can download the free version, which works perfectly for this tutorial, or feel free to pay for additional features in the paid version:
- GoToApp Demo - $0.00
- GoToApp Full - $2.25

Many, many thanks go out to site visitor, Joanne Swanson, who pointed out this method of using GoToApp to more easily access the camera!
I remember seeing the camera app in the GoToApp, but because I hadn't personally used it for awhile I completely forgot about it.
Way to go, Joanne, for being such a wonderful Kindle Fire fan and sharing this tip with the rest of us! Because of her thoughtfulness I've updated this page to include this faster, easier method.
Please see her comments at the bottom of this page and leave your own little "thank you" to show her your appreciation.
This app is so handy that's already listed in my Best Kindle Fire Apps so if you haven't already seen this exclusive list, be sure to subscribe to my Kindle Fire Alerts to get your virtual hands on it!
Did you download GoToApp? Alright, now open it. It should automatically scan your Kindle Fire for apps and organize them in a somewhat acceptable way.
You can organize, rename, create, and delete folders for organizing your apps, but for now, let's focus on the camera.
After opening GoToApp you should see the camera app icon right in the main folder. Tap it:
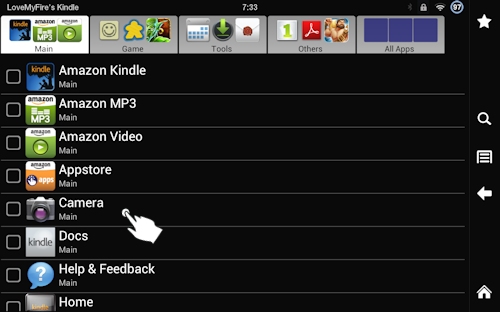
That will open your camera and you can continue on to the section below on how to use your Kindle Fire camera for taking both photos and videos!
But don't miss my next instructions for using an alternate method, you might prefer it.
Method #2: Use ES File Explorer
The first thing you will need to do is find and install the amazing FREE app, ES File Explorer.
Once you've downloaded this super handy app, go ahead and open it up.
UPDATE NOV 2021: The most useful features of ES File Explorer have now been moved to the premium version (which is NOT free). However, at the time of writing there is a 7 day free trial on offer.

This app is also listed in my Best Kindle Fire Apps and one that I've mentioned in other tutorials on this site. Even if you prefer the first method above, you'll still need this app to access your photos in the instructions listed below this method.
Note: If your screen doesn't look like the ones in the images below (ie you have a gray background) you'll need to update ES File Explorer to the most recent version.
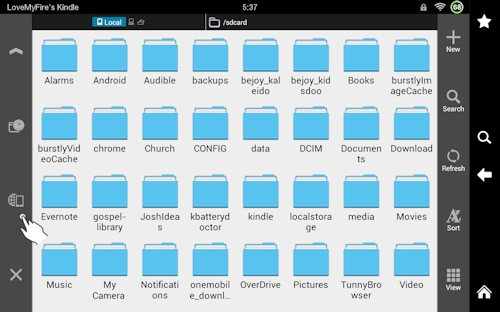
Now tap on the icon that looks like a globe with a phone on it:
(If your screen is in portrait, the icon will be at the top left)
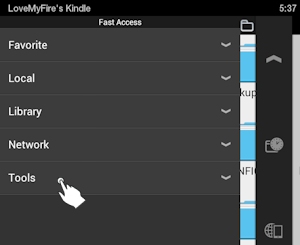
Tap "Tools":
Tap the icon that looks like a window with a clock on it:
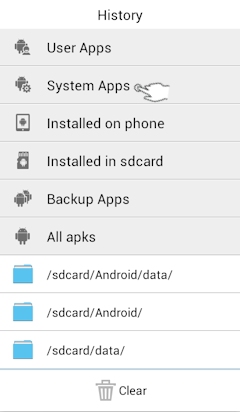
Tap "System Apps":
Tap "Camera" and then "Open":
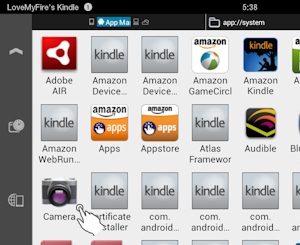
Voilà! You have now found your Kindle Fire's hidden camera!
Just take a picture of something, or someone, and there you go. Here, I'll show you how.
Ready, Aim, Fire!
Taking a picture can be a bit of a challenge since the camera on the HD Kindle Fire is a front-facing camera (to use as a webcam with Skype). Couldn't Amazon have given us a forward facing camera too?!
Anyway, to take a Kindle Fire picture you "just" aim and then tap the blue button, all without moving- it's harder than you think! The picture will automatically be saved until you're ready to find it later:
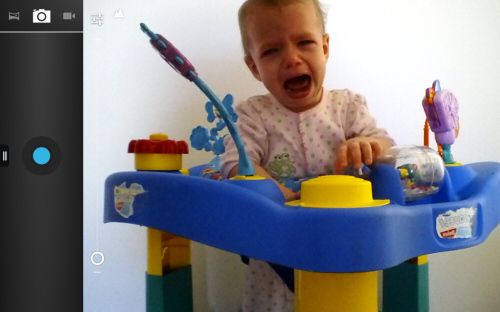
Uh oh! Someone doesn't want her picture taken.

Actually, she was very happy having her picture taken until I put her in the bouncer. She did NOT want to be in there. Poor thing! It was nap time anyway, so she was really ready for her mid-day snooze. (She's a screamer, if you couldn't tell.)
Video Time!
To take a video, tap the video icon at the top left. This is another great reason to use these methods to access the camera app, as some of the other apps don't have the video option.
There's a simple zoom bar right on the screen, that's easy to use, as well as a panoramic camera option to the left of the camera icon. I wasn't too successful in my brief attempt to figure it out, perhaps you'll have more luck/patience.
The camera app also has some fun settings you can toy with, just tap the icon to the right of the camera icons, as shown in the screenshot below.
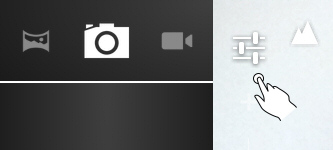
I don't know what all the settings do, so have fun experimenting with them. :)
Accessing Your Photos and Videos
Now that you've taken some pictures and videos, you probably want to look at them, don't you? Of course you do!
You can go to the Photos section on your Kindle Fire and then make sure you're viewing photos on your "Device". There will be a folder that says, "Camera", your pictures should be there!
That's all there is to it. :)
Finding Kindle Fire Photos with ES File Explorer
You can also access your photos with the ES File Explorer app which is an excellent way to have access to the folders and files on your Kindle Fire.
To start, exit out of the camera by tapping the Kindle Fire menu viewer (double lines next to the blue button), and tapping the back button.
You should be back in ES File Explorer, if not just open it back up.
If you are still in the System Apps screen (where you tapped on the camera) tap the "X".
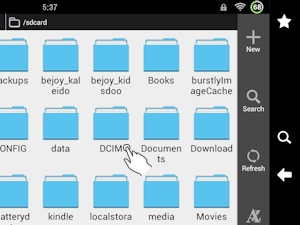
Tap the "DCIM" folder:
Tap the "Camera" folder:

Now you should see your pictures and videos:

Tap a photo or video that you want to view. When you do you will get a couple of options, depending on what other apps you have installed on your Kindle Fire.
(Note: the following screenshots are from an older version of ES File Explorer, but they have the same basic info.)
When tapping a picture:
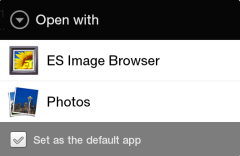
The ES browser is the one that came with the ES File app, while the other is your Kindle Fire Photo viewer.
When tapping a video:
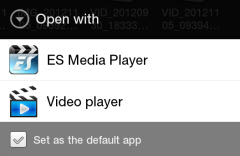
The ES player is the one that installed with the ES File Browser. The other is your basic Kindle Fire video player.
Each photo/video viewer is a little different, but the basic options are the same.
Delete, Delete, Delete! Share, Share, Share!
With the camera not being a regular forward facing one, you'll no doubt need to delete many of your attempts at capturing the world around you. I know I did! Just tap and hold down on a picture or video and you'll be given a ton of additional options, such as delete, rename, and share.
Photo Editing Apps
As I mentioned above, here are some great apps for taking Kindle Fire photos and then editing them right on your tablet.

Prices are subject to change at any time and without notice. Products listed as free may no longer be free. Please confirm all prices before purchasing products. LoveMyFire.com is not responsible for any price changes or purchases you make. Please see the Terms of Use.
Optional Apps:
- Photo Editor - $0.00
- PicShop Lite - $0.00
- PicShop - $2.49
There are several others out there, but the top two free ones are those I've tried out thus far.

So now you've learned how to take Kindle Fire pictures and videos! If you appreciate this tutorial please share your "thanks" by posting a snazzy photo (one you took from your Kindle Fire of course) right on my Facebook page!
I hope you've enjoyed this fun tutorial! Learn even more about your Kindle Fire with my other Kindle Fire Tricks and Tips.

Hand Illustrations provided by GestureWorks® (www.gestureworks.com). Aren't they perfect?



Leave a Comment:
I love receiving your comments, but please read the notes below before posting. Thank you!NOTES:
- I continue to receive questions I've already answered in my FAQ or in articles on my site. PLEASE check there first!
- All comments are moderated. If you leave the page you won't see your comment until it is approved.
- Select the "Post to Facebook" check box to be notified on FB when a reply has been posted.
- If you scan the previous comments you may find an answer to your question. Click the "View X more" link at the bottom (if visible) to see all comments.
- If you're having trouble accessing my exclusive Kindle Fire articles, please email me directly instead of posting in these comments.
Thanks for sharing!