
SD Card For Kindle Fire
Updated July 07, 2023
Are you thinking about getting an SD card for your Fire Tablet and need some tips for using it?
Or perhaps you're trying to decide if buying a Fire with a smaller memory - than expanding it with an SD card - is a good way to save money when buying a Fire tablet?
In this article I aim to answer your questions about using an SD card with your Fire... and why I personally prefer to buy my Fire tablets with the largest built-in memory I can afford.
FTC Disclosure: If you make a purchase via a link on this site, I may receive a small commission. There will be no added cost to you. Thank you!

Amazon quietly dropped the 'Kindle' name from its Fire tablets back in 2014, but to a good many of its customers (myself included) the device will always be 'my Kindle'.
I've included the name throughout this article to make it easier for people searching for information about their 'Kindles' to find what they are looking for!
(Click here to discover the differences between Kindles and Fire tablets)
Why would you need an SD card for your Kindle Fire?
Some older Fire tablets have storage as low as just 8 GB (although now even the Kindle 7 has now been upgraded to have 16 GB).
If you like to download movies or large games and apps, then with just 8 GB (or even 16 GB) of storage, you may soon find yourself running out of space.
There's nothing more frustrating than trying to download something, finding you don't have room for it, then desperately looking for things you can delete from your tablet!
An SD card (or, in the case of Kindle Fires, a microSD card) provides a partial solution, giving you a bit more room to work with.
However, unlike adding RAM to a computer - which is a straightforward way of expanding its memory - using as SD card for a Kindle Fire needs a little more managing.
You will need to make decisions about how you want the card to be used and what data you want to be stored on it.
Important Note!
Before buying an SD card for your Fire, make sure you really need one!
Amazon's "cloud" facility allows you to virtually store much of your content.
Delete any books or apps that you're not actively using from your device.
This may free up enough space for your needs and you can always go back and re-download items from your cloud later.
The best SD card for the Kindle Fire
For the very best performance, Amazon recommends buying a "Class 10" or "UHS" (Ultra High Speed) micro SD card.
These are a bit more expensive than the "Class 2" cards, but they are faster.
You can use a micro SD card that holds up to a maximum of 128 GB.
If you require more storage, then you can buy multiple SD cards (but remember that if any data is downloaded to your SD card, you will not be able to access that data unless that particular SD card is inserted).
If you plan to use your SD card for internal storage to run apps (more on that later in this article), then you should look for a card with an A1 or A2 rating. These are believed to help apps run more efficiently.
The "Made for Amazon" SanDisk 128 GB micro SD Memory Card (Amazon) gives you a decent bang for your buck. It offers Class 10 performance for Full HD (1080p) video recording and playback and is certified to play nicely with Fire tablets!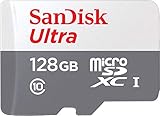
If you're looking for super-fast speeds - particularly if you will be running apps from the card - you might want to invest a little extra in the SanDisk Extreme Pro SDXC UHS-I U3 A2 V30 128GB (Amazon). With speeds up to 170MB/s, it's a great choice for eliminating lag and offers good value for money.

How to put the SD card into the Kindle Fire
If you're used to putting a SIM card into your phone, you'll know that's it's a fairly simple matter of using a little pin to pop open the tray, positioning the card in place and sliding the tray back in until it locks. Easy peasy!
However, it's not quite that easy with your Fire.
First, you need to turn your Fire off and locate the SD card slot, which is positioned towards the top of the right-hand side.

Using your fingernail, a flat-bladed screwdriver, a sharp knife - or the little pin from your phone! - start at the top and pry the cover from the slot.

NOTE: This can be quite fiddly - and the cover doesn't come off completely. Instead, it pivots downwards, which I think makes it pretty vulnerable to snapping off! So handle the cover very carefully when inserting/removing your SD card.
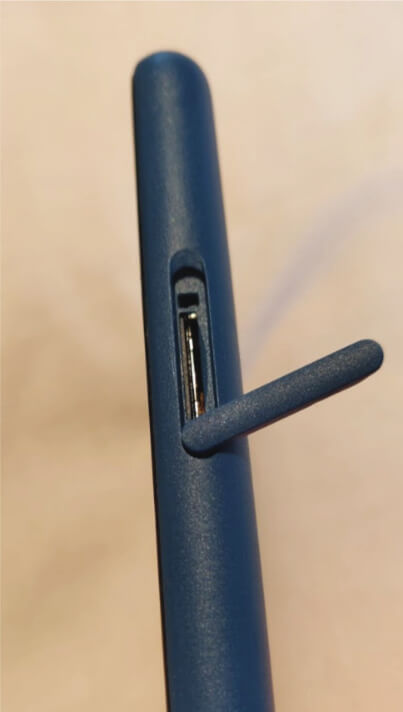
Now, insert the SD card carefully until you hear or feel a very faint 'snap' that tells you it's locked into place. Again, this isn't easy and you may need to use something to push it in properly (I use my nails but my son - who bites his! - uses a flat-bladed screwdriver).

Important Note!
If you have a Fire HD 8 (7th Generation), you need to insert the SD card so that the front of the card is facing the back of the device. (I'd love to know which design genius was responsible for that one!).
For all other Fire tablets, the front of the card needs to face the front (just as it should!).
Warning!

A few unlucky Fire owners have discovered that it's easy to accidentally push the SD card into the little gap between the tablet's case and the micro SD slot, where it promptly gets stuck and is almost impossible to remove.
Take great care when inserting the SD card - make sure you have plenty of daylight and can clearly see where the card is going! If - like me - you use glasses to read, wear them at this point!
How to remove the SD card from your Fire tablet
When or if you need to remove the SD card, go to "Settings" and tap "Storage".
Tap the "Safely remove SD card box" then tap "OK".
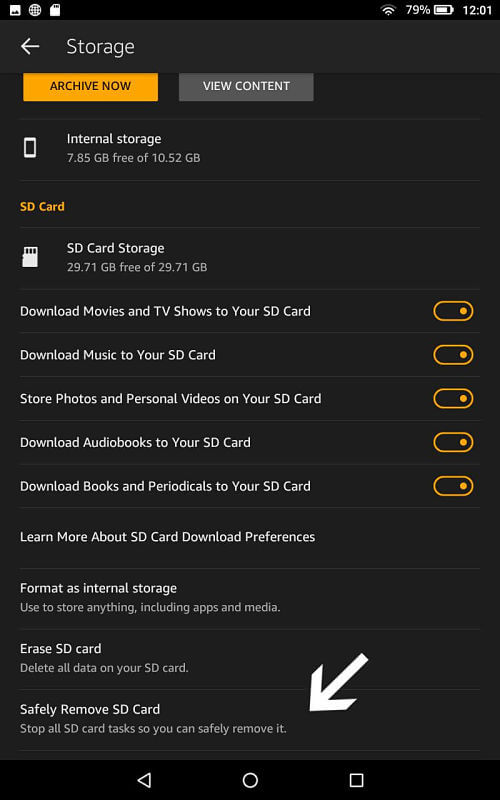
This stops your tablet from carrying out all tasks associated with the card, preventing your data from being corrupted.
Open the cover for the SD card slot (as described above) and gently press on the SD card, which should release it and make it pop back out.
(If you're struggling, use the same tool to pop it out that you used to push it in).
Using the SD card with your Kindle Fire
Once you've successfully inserted the Micro SD card, you will be prompted to set the card up, ready for use.

At this point, some users receive a warning that the SD card is not compatible with their device. This is usually easily remedied by allowing your tablet to 'format' the card when prompted (as described below).
Warning!
Formatting an SD card erases everything on it. If it's a new SD card, then this obviously not an issue - but if you are inserting a card that already contains saved data, then it absolutely is!
Choosing between internal storage and portable storage
If you have a Fire 7 2019 (9th Gen), a Fire HD 10 2019 (9th Gen) or a Fire HD 8 2018 (8th Gen) you will be given the option of using the SD card as internal storage or portable storage.
Using the SD card as internal storage ( also known as 'adoptable' storage) essentially means making it part of the permanent internal storage of your Fire tablet.
The benefit of choosing this option is that it allows you to download larger files (likes apps).
However, I recommend NOT choosing this option (even though your device may say otherwise).
If you choose to make the card part of your internal storage YOU CANNOT REMOVE IT FROM THE DEVICE.
If you do
- It will not work on any other device
- Apps you installed on your Fire whilst the card was inserted may no longer work properly
- You will get a pop-up message telling you to either re-insert the SD card, or to select "Forget". If you select "Forget", then you will lose all the data on the card
It's also worth noting that - if the SD cards malfunctions in any way - all the data on it will be lost!
If you choose to use the SD card as portable storage, it will be formatted differently and you will then be able to remove it and use it in different devices, and to transfer content between them.
The downside is that portable storage cannot be used to store apps and their data.
But given the problems associated with doing this (as mentioned above), my preference would be to use portable storage for everything that can comfortably be moved, and my device's internal storage for apps.
Important note
If you have multiple profiles set up on your device, please note that any content downloaded to your Fire's SD card can only be accessed by the profile that downloaded it
Using your SD card as internal storage
If you decide to go ahead with this option, your device will format the card, first warning you that it will no longer work in other devices and that any existing content stored on it will be erased.
It will then become part of the internal storage of your device.
You will be given the option to move existing data to the card, but you will not need to manage your download preferences as you would for portable storage (below).
To format your SD card for internal storage...
Simply tap this option to select it, once prompted. You should then see the screen explaining that your card will be formatted and that you will ONLY be able to use it with your Fire device.
Tap 'Erase & Format' if you're happy to go ahead.

The next screen will confirm that formatting is in progress.

When formatting is complete, you'll be given the option to move data to the card in order to free up internal storage.

Once you've made your choice, you'll then see the screen confirming that your SD card is ready for use!

You can now go into your settings and tap 'Storage', where you will see that your SD card has been successfully installed.
It's listed separately to the internal storage, even though you have chosen to make the card part of the internal storage - which means the integration is not quite as 'seamless' as Amazon describes!

You'll see here that you have the option to move data to the card (if you didn't already do so during setup), plus any apps (if available).
Changed your mind and want your SD card for portable storage instead?
Then your are provided with this option on the storage screen (above).
If you select the option to re-format the SD card for portable storage, you'll be given a warning that any data on it will be erased.
If you're happy to go ahead, tap 'Format & Erase' and hey presto - your SD card is now formatted for portable storage instead.

To format your SD card for portable storage from the outset
After initially inserting your SD card, select the option to 'Use as portable storage'.
You'll receive confirmation that your SD card is now successfully up and running.
You'll then be taken to the 'storage options' on your device to decide which types of files you would like to automatically store on your SD card.
You can use portable storage to download music, movies, TV shows, books, periodicals and audiobooks, plus store your photos and personal videos.
You cannot use it for downloads from the Silk browser or email - these can only be downloaded to - and stored on - your device's internal storage.
As mentioned earlier, you cannot opt to download apps to portable storage.

Moving existing content to your portable SD card
If you already have videos, books, photos etc stored on your device that you would now like to store on your SD card instead, you will need to...
- Delete them from your device
- Re-download them from the cloud
If you've adjusted your settings as shown above, then your photos, books etc will automatically download to the SD card instead of your device.
For example, if you want to move a video to the SD card...
- Ensure that you have activated the setting to download videos to your SD card
- Tap "Videos"
- Find the video you want to move
- Long press the title, then tap "Delete"
- Long press it again, then tap "Download"
This will re-download the video directly to the SD card.
NOTE: Non-Amazon books can only be downloaded to your Fire's internal storage, not to your SD card.
Changed your mind and want your SD card for internal storage instead?
Then tap 'Format as internal storage' on the storage screen (above).
If you select the option to re-format the SD card for internal storage, you'll be given a warning that any data on it will be erased and that the SD card will no longer work with other devices.
If you're happy to go ahead, tap 'Format & Erase' and your SD card will be re-formatted for internal storage.

Planning on transferring data from your old Fire to a new one?
Read this!
You CANNOT take the SD card from an older Kindle Fire and then transfer those files via the SD card to your new one (8th generation+)!
That's because Fire tablets USED to accept SD cards that used something called an 'exFAT' format.
Newer Fire tablets no longer support exFAT and will only accept Micro SD cards that use the FAT32 format.
Yes, you could allow your tablet to reformat the old card so you can use it in your new tablet - but you'd lose all the files you'd saved on it in the process.
In my opinion, this is a huge problem and one of the reasons I'd always opt for buying a device with the largest internal storage I could afford.
More about FAT32...
This is a pretty outdated format and presents a big problem for us as users.
FAT32 Micro SD cards cannot store single files over 4 GB in size!
This means that any individual file we download to the SD card must be a maximum of 4 GB, which rules out most movies!
This limitation only applies if you use your SD card for portable storage rather than internal storage. But, as I explain below, using your SD card for internal storage is not something I'd recommend!
Another limitation of your SD card is that you cannot copy files to or from your PC using a USB wire.
Whilst this used to be possible, you can now only access the original internal memory of your Fire tablet from your PC... even if you use your SD card as internal (or adoptable) storage.
Getting the 'SD Card Unexpectedly Removed' message?
I actually received this message after using my Fire once the SD card was successfully installed. It definitely hadn't been 'unexpectedly removed' so I simply ignored the message and everything continued to work just fine.
I've also heard from other visitors who have received the same - incorrect - message on random occasions!
If the problem persists, try safely ejecting and re-installing the SD card.

To check your SD card is properly installed
To check that the SD card is successfully up and running on your Kindle Fire at any time, go into your settings and tap 'Storage'.
The SD card should appear under the Internal Storage section
You will be able to see how much space you have on the card - a welcome sight if your Fire has been filled to capacity for some time!
If it starts getting too full again, you can use the option to "Archive" things you don't use often and free up more space.
You will also see an option to erase data on your card, which does just what it says!
Please note that you can't eject your SD card from your Fire OR erase the data on it whilst your tablet is connected to your computer with a USB wire. Simply unplug it to do so.
I hope this page has been helpful and you were able to set up the SD card on your Kindle Fire without any problems. If you have any questions, please feel free to leave me a comment in the comment box below.
I ♥ My Fire!
-Christine


By Christine Albury, Owner of LoveMyFire.com
©Copyright 2024 Love My Fire All rights reserved.
No reproduction permitted without permission.
Please read the Terms of Use , Disclosure, and Privacy Policy before using this site.
LoveMyFire.com is a participant in the Amazon EU Associates Programme, an affiliate advertising programme designed to provide a means for sites to earn advertising fees by advertising and linking to Amazon.co.uk/Local.Amazon.co.uk/Amazon.de/de.BuyVIP.com/Amazon.fr/Amazon.it/it.BuyVIP.com/Amazon.es/ es.BuyVIP.com and is also a participant in the Amazon Services LLC Associates Program, an affiliate advertising program designed to provide a means for sites to earn advertising fees by advertising and linking to amazon.com or myhabit.com.
Subscribe to Love My Fire's Kindle Fire Newsletter!

To be notified of new Kindle Fire news, deals, articles, exclusive content, and more subscribe to my Kindle Fire Email Alerts!
I hate spam too and promise to only send you Kindle Fire Alerts.
(See Privacy Policy for details.)
Leave a Comment:
I love receiving your comments, but please read the notes below before posting. Thank you!NOTES:
- I continue to receive questions I've already answered in my FAQ or in articles on my site. PLEASE check there first!
- All comments are moderated. If you leave the page you won't see your comment until it is approved.
- Select the "Post to Facebook" check box to be notified on FB when a reply has been posted.
- If you scan the previous comments you may find an answer to your question. Click the "View X more" link at the bottom (if visible) to see all comments.
- If you're having trouble accessing my exclusive Kindle Fire articles, please email me directly instead of posting in these comments.
Thanks for sharing!