
How to Resize Your Kindle Fire Wallpaper
A Tutorial to Change Your Pictures for Your Amazon Tablet

This tutorial for resizing your Kindle Fire wallpaper goes along with my instructions on how to change your wallpaper. (For newer tablet owners see my Kindle Fire Android Wallpaper tutorial.)
In step one of that article you need to resize your photos, but not everyone has photo editing software or knows how to use it.
FTC Disclosure: If you make a purchase via a link on this site, I may receive a small commission. There will be no added cost to you. Thank you!
In response, I've created this Kindle trick and tip to help you know how to use a free online editor to resize your pictures, whether landscape or portrait, so you can fit them onto your Kindle Fire.
Then you can show them off to all your friends. :)
Select a Photo

First, select the photo you want to use.
If you don't have one at the moment, here's a beautiful picture of a purple iris you can use. (I took this pic myself so I own the copyright and give you rights to use it for personal use.) Or, if you'd like to skip this step and use some photos that have already been resized, see my free Kindle Fire flower wallpapers that are ready to go.
For this tutorial I'm going to use my own wedding photos, 'cause I own the rights on those too, and I'd like to have these pics on my Fire so I might as well edit photos I want to use. ;)
If you haven't yet read step one, Resize Your Photos, from my guide to changing your wallpaper, go read it so this article will make sense.
Free Online Photo Editor
When I searched for an online photo editor I found one at Pixlr.com which I tested and was able to use with fairly good results.
If you have another photo editor you'd like to use that's fine, but of course the instructions will not be exactly the same, although you're clever so I'm sure you can figure out each step using a different program.

Important Note!
While testing out this tutorial with my husband, we discovered that his newer Kindle Fire shows the wallpaper images different than mine (see the images below as well as my page about Kindle Fire Backgrounds for all the details).
|
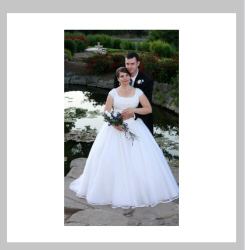
My Husband's Kindle Wallpaper 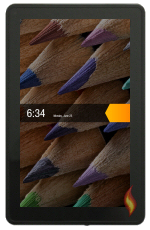 |
My Kindle Wallpaper 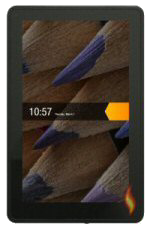 |
Before you begin this tutorial you will need to check to see how your tablet displays the photograph on your start screen as this will affect which instructions you need to follow. Does your image look the same as the ones I've displayed on the Kindle Fire Background page? Those are from my husband's Kindle. Or is your image zoomed in like mine? |
For this tutorial I will give instructions for both, listing the newer wallpaper view (zoomed out) in the column on the left with the older view (zoomed in) on the right.
Resizing Portrait Photos for Your Kindle Fire Wallpaper
All images need to be 1024x1024 (width x height) pixels to work properly with the side loaded Rotating Wallpaper app or they get stretched weird. The main issue is that the wallpaper doesn't display the entire picture on your Kindle Fire. Newer Kindles show 602x1024 pixels while older ones only show 515x880 pixels.
The easiest images to work with are those that are at least 1024 (or greater) for both width and height. If your image is smaller it will need to be larger which, depending on how small it is, may lower its quality.
But don't worry, if you want perfect pictures on your tablet I'll walk you through the entire process step-by-step.
Step 1: Open Picture
To start, we'll use a portrait picture (scroll down for instructions on using landscape images).
Using your browser, go to Pixlr.com and click on "Open photo editor".
Click on "Open image from computer".
Browse to the image you want to use and open it.
 |
Step 2: Resize Height
Click on "Image" in the top navigation bar. Select "Image size...".


|
Newer (not zoomed) Kindle Fire: Resize your photo's height to 1024.  |
Older (zoomed in) Kindle Fire: Resize your photo's height to 880.  |
Make sure the "Constrain proportions" stays checked, that's what
keeps your image from stretching, see how the width changed? (Your
initial numbers will vary, depending on the original size of your
photograph. If smaller, your image may become pixelated.)
Click "Ok".
Your image may look really small, that's just because it's zoomed out. Use your mouse's scroll wheel to zoom in and out, or you can use the "Navigator" window at the right to change the level of zoom.
Step 3: Resize Canvas
This step lets you see how your wallpaper will look on your Fire.
Click on "Image" and select "Canvas size...".

In the Anchor area select the box in the
middle.
|
Newer (not zoomed) Kindle Fire: Change the width to 602 pixels. 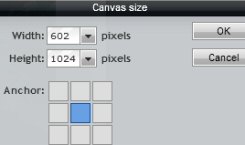 |
Older (zoomed in) Kindle Fire: Change the Width to 515 pixels.  |
Click "Ok".
You can also change the Anchor to the far left or right to cut off space on either side if that works better for your picture.

If you want to get daring, go ahead and use the crop tool to select the area you want to keep, but make sure the image is at least 602x1024 pixels (515x880 pixels for older tablets) or you will have white space on your final Kindle Fire wallpaper.
Also, you don't actually need to do this step if your image is already centered and fits within the 602 (or 515) pixels. If the picture has extra space on both sides it will not be seen when the image is displayed.
The main purpose of this step is to make sure your picture will look correct on your Kindle as a wallpaper and won't chop off someone's head. This way you can adjust as needed.
Step 4: Increase Canvas Size
Next go back to "Image" and "Canvas size...".
Now change the width (and the height for older tablets) to 1024.
In the Anchor area select the box in the middle. This will keep your image in the center of the canvas and adds the extra white space evenly around your photo.
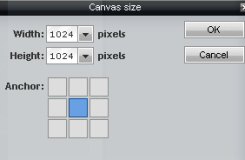
Click "Ok".
Now your image should show white space on the sides (and top and bottom for older tablets).
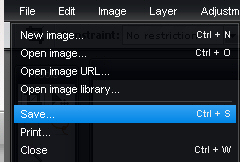
Step 5: Save Picture
Click on "File" in the top nav bar. Select "Save...". (You'll be able to rename the file so you won't overwrite the original.)
In this window you can change the name of the file, the format, and the quality. If you change the quality the file size will increase/decrease as shown in the bottom right above the ok button.
I like to add a photo's dimensions to my file names so for this one I will add 1024x1024 to the name, "wedding-p-1024x1024" (the p stands for portrait). But you don't have to, whatever you name your image is fine, just remember it so you can find it again later when you add the wallpaper to your Kindle Fire.

When you're done, click "Ok".
A window will open up which will let you save the photo to your computer. Choose where you want to save it and then click "Save". (You can also change the file's name in this window.)
To stay in sync with my other tutorials, I am saving this file in my "wallpaper" folder.

Your photo is now ready! Head on over to my other tutorial on Changing Your Kindle Fire Wallpaper for detailed instructions on how to do the rest.
Or continue on to learn how to resize pictures that are landscape.
Resizing Landscape Photos for Your Kindle Fire Wallpaper

For landscape photos we will be using a similar, yet slightly different process... of course.
There are two main ways in which you can resize and crop landscape photographs for them to work as background images on your Kindle Fire.
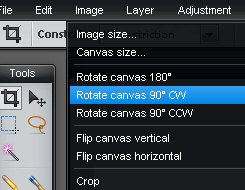
1. Regular Landscape Wallpaper
The first way is to rotate your photo 90 degrees clockwise (cw) and then treat it like a portrait image. This way the image will be landscape on your Fire when you turn it to the side (like in my wedding pic above).
Here's this step if you want to try it out.
Click "Image" at the top and select "Rotate canvas 90° CW".
Now scroll back up and follow the resizing portrait instructions above to complete your Kindle Fire wallpaper.

For the picture above I picked the far right middle Anchor in step three, "Resize Canvas" causing the extra space to only be cropped off the left side instead of the right, since I didn't want our heads chopped off. ;)

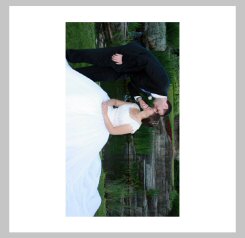
2. Cropped Landscape Wallpaper
The second way is to treat your landscape photo as a portrait image from the beginning. This only works on photos that can have a huge chunk cut from the original picture.
To do this, follow the regular portrait instructions above. The results look like this:
 |
 |
As you can see the picture is off center, but that's because the original picture doesn't have both of us I in the middle, just me- the bride!
I could change how I cropped the image but I think I kind of like it this way. ;)
Once you're done resizing and cropping your beautiful pictures, it's time to create a custom wallpaper on your Kindle Fire! (Newer tablet and HD owners, please see my Kindle Fire Android Wallpaper tutorial instead.)

I bet you could follow this tutorial to resize your wallpaper right from your Kindle Fire! I haven't tried it yet but will let you know when I test it out. This would be perfect for images you already have on your tablet (viewable in your gallery) as you wouldn't have to transfer them to/from your computer. Sweet!
See my other Kindle tricks and tips for other great tutorials, guides, and tools!
|
|
|

Search this site!

By Christine Albury, Owner of LoveMyFire.com
©Copyright 2024 Love My Fire All rights reserved.
No reproduction permitted without permission.
Please read the Terms of Use , Disclosure, and Privacy Policy before using this site.
LoveMyFire.com is a participant in the Amazon EU Associates Programme, an affiliate advertising programme designed to provide a means for sites to earn advertising fees by advertising and linking to Amazon.co.uk/Local.Amazon.co.uk/Amazon.de/de.BuyVIP.com/Amazon.fr/Amazon.it/it.BuyVIP.com/Amazon.es/ es.BuyVIP.com and is also a participant in the Amazon Services LLC Associates Program, an affiliate advertising program designed to provide a means for sites to earn advertising fees by advertising and linking to amazon.com or myhabit.com.
Subscribe to Love My Fire's Kindle Fire Newsletter!

To be notified of new Kindle Fire news, deals, articles, exclusive content, and more subscribe to my Kindle Fire Email Alerts!
I hate spam too and promise to only send you Kindle Fire Alerts.
(See Privacy Policy for details.)
Leave a Comment:
I love receiving your comments, but please read the notes below before posting. Thank you!NOTES:
- I continue to receive questions I've already answered in my FAQ or in articles on my site. PLEASE check there first!
- All comments are moderated. If you leave the page you won't see your comment until it is approved.
- Select the "Post to Facebook" check box to be notified on FB when a reply has been posted.
- If you scan the previous comments you may find an answer to your question. Click the "View X more" link at the bottom (if visible) to see all comments.
- If you're having trouble accessing my exclusive Kindle Fire articles, please email me directly instead of posting in these comments.
Thanks for sharing!